AdGuard Home with Handshake DNS
November 04, 2021 By UnOrdinary
Why Run AdGuard Home with Handshake DNS Resolver?
Let's explore the reasons behind this choice…
Imagine you are currently using a centralized DNS resolver like Cloudflare 1.1.1.1 , Google 8.8.8.8 or Quad9 9.9.9.9 for your AdGuard Home setup. However, what if these centralized companies experience server downtime for several hours? In such cases, there is little you can do except wait for them to resolve the issue through their own employees.
This is precisely why we have chosen Handshake and its accompanying lightweight client called HNSD HNSD acts as a decentralized DNS resolver, leveraging the Handshake Full Node network. By adopting this decentralized approach, even if some servers go down, there are still numerous active servers, ensuring the network remains resilient and cannot be easily taken down. The lightweight nature of HNSD further enhances its efficiency, with a minimal size of just 12MB. It's important to note that Handshake's DNS resolver (HNSD) can also resolve standard ICANN domains, such as https://google.com/
Setting Up AdGuard Home
Let's begin by setting up AdGuard Home. The process is straightforward. Follow the instructions provided in the AdGuard Home Getting Started Guide
Once you have completed the AdGuard Home setup, proceed to the next step.
Setting Up HNSD
The following steps assume you are using a Debian-based distribution.
As a preliminary step, we need to build HNSD from source until a prebuilt package becomes available. You can download the prebuilt package from the official HNSD releases page once it is released. Follow these instructions to build HNSD from source:
# Clone the HNSD repository:
git clone https://github.com/handshake-org/hnsd.git

# Change to the HNSD directory:
cd hnsd

# Build HNSD:
make

# Test if HNSD is running correctly:
./hnsd -p 4 -r 0.0.0.0:5300
Note: By default, AdGuard Home uses port 53. Therefore, we are using port 5300 for HNSD to avoid conflicts. You can choose a different port if desired.
Once you have verified that HNSD is working correctly, you can stop it by pressing CTRL + C for now.
Next, we need to configure HNSD to start automatically when the system boots. Follow these steps:
Open the HNSD service file for editing:
sudo nano /etc/systemd/system/hnsd.serviceCopy and paste the following content into the hnsd.service file:
[Unit]
Description=hnsd
After=network.target

[Service]
Type=simple
Restart=always
RestartSec=1
User=root
ExecStart=/home/username/hnsd -p 4 -r 0.0.0.0:5300

[Install]
WantedBy=multi-user.target
Make sure to replace /home/username/ in the ExecStart line with the appropriate directory and username.
Save the file by pressing CTRL + O then exit the editor by pressing CTRL + X .
Now, it's time to enable and start HNSD using systemd:
sudo systemctl daemon-reload
sudo systemctl start hnsd
sudo systemctl enable hnsd
Configure AdGuard Home
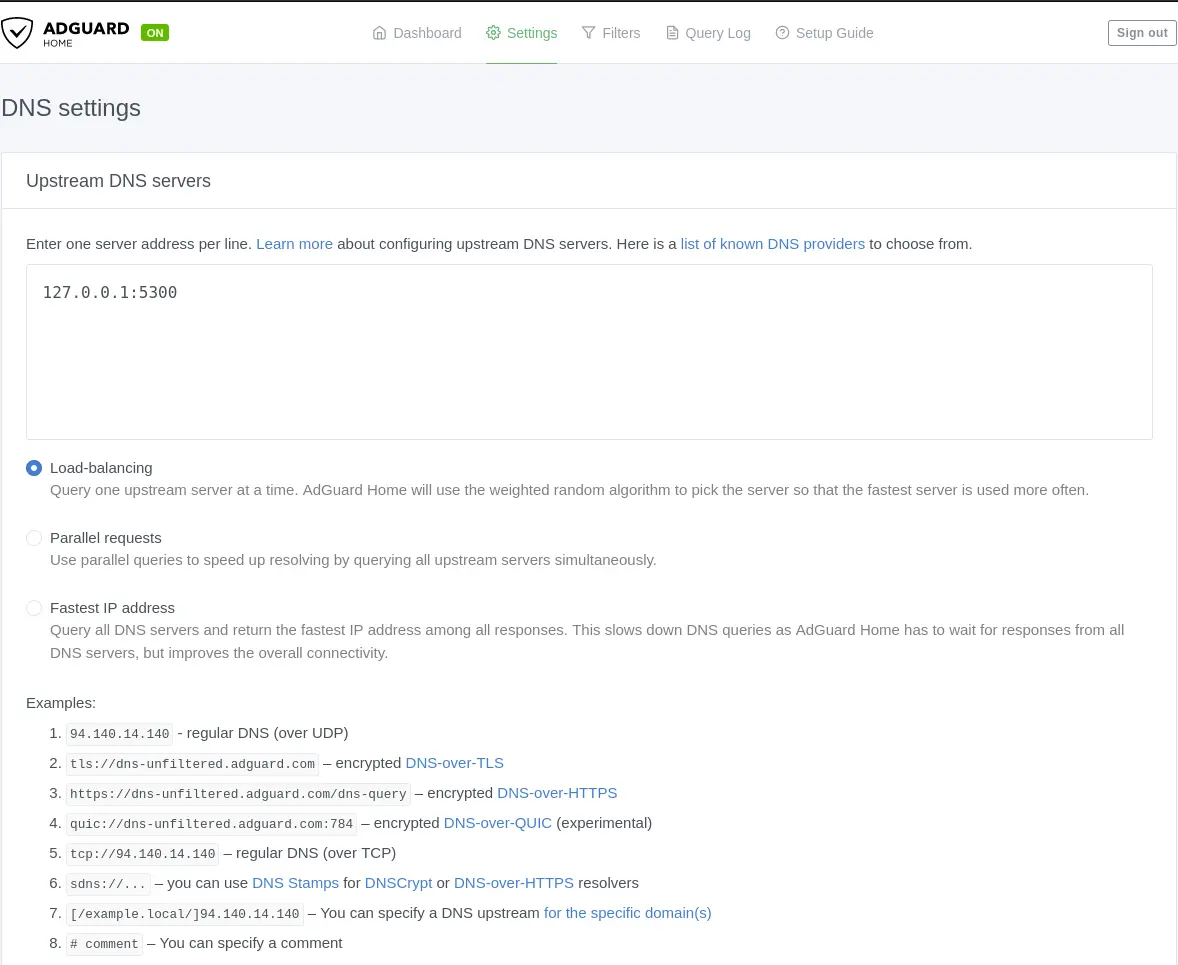
Visit the AdGuard Home web interface and go to Settings → DNS settings.
Add your localhost IP:
127.0.0.1:5300Enter this IP address in the Upstream DNS servers section, as shown in the screenshot below:

Scroll down, click Apply and then click Test Upstreams
You should see a success notification indicating that the upstream DNS servers are working correctly.
Verify the Configuration
Finally, let's test the setup by using the AdGuard Home IP address in the terminal:
dig @YourAdGuardHomeIP proofofconcept +dnssec
Example:
dig @100.10.10.10 proofofconcept +dnssec
You should see the IP address associated with the https://proofofconcept/ domain, as shown in the screenshot below:

Congratulations! You have successfully configured AdGuard Home with Handshake DNS Resolver.
Modified: May 29, 2023